Showing posts with label pinterest. Show all posts

Jun 9, 2014

Sewing slave

Guess who just bought a new serging machine?  Who also got their sewing machine fixed?


Not this lady.  But my mom did!  I've finally found my sewing slave.

How does a sewing slave work?  First step, find someone who will sew for you.  Second step, send them patterns.  Doll pattern here.  Third, buy material.  Fourth, wait patiently for it to be done.  Fifth, thank your sewing slave publicly. 

Thanks Mama!  Aiko loves her new dolls.

May 6, 2014

Birdseed Breakfast or Granola


I've had a few people ask for this granola recipe. I fondly call it my "Birdseed Breakfast."


I originally found this recipe on Pinterest (of course) but as always, I never can follow a recipe completely.  I keep a bunch of different grains/seeds handy, as I buy them in bulk from WinCo or Smith's.  I actually use them as a kind of a decoration.  I have jars and jars full of different grains, nuts, seeds, and beans.  Love me some dual purpose items.  


Anyways, I really love this granola, I've made it twice in the last 3 weeks.  Granola from the store is always so expensive!  Plus, you don't really get any good things in it (like nuts and fruits) and if you actually look at the ingredients...it's not really healthy for you either.  I always figure if I don't know what the ingredient is, I probably shouldn't eat it.  These ingredients are simple, and I know exactly what I'm putting in my granola.  

Now, I'm putting down measurements, but just be aware, I always change recipes around.  I feel that this recipe is a good put-whatever-you-have-laying-around.  Which, is kind of how I got to my recipe.  I just added this seed, some of this grain, some of these nuts.  You see what I'm saying?


Birdseed Breakfast Granola 

3 c. rolled oats (not instant)
2/3 c. nuts (I used pecans and almonds but again, I would use any I had in the house)
1 c. millet/flax seed/sesame seeds/pumpkin seeds  (I kind of mix these all together or if you really need exact measurements used 1/4 c. for each.)
1 c. coconut unsweetened (I've used chips/shredded.)
Pinch of salt
1/2 c. coconut oil
1/2 c. honey
1 tsp. vanilla (I was just thinking that almond extract would make this yummy too.)
1 c. dried fruit.   

Mix all the dry ingredients together in a large bowl, except for the dried fruit.  In a saucepan melt the coconut oil, honey, vanilla and salt.  Pour over the dry ingredients and mix thoroughly until coated evenly.  Place on a cookie sheet and spread evenly.  Bake at 325 for 15 minutes and then stir. Bake another 15 minutes and then stir once again.  I've done this up to 3 times to get a nice golden color on the granola.   Allow to cool. 

Once it's cool I place it in different jars.  I like to keep my raisins and other dried fruit separate until I'm ready to eat some granola. The millet adds a nice crunch to it.  I've added bananas, craisins and raisins.  All delicious. 

*I have always doubled the recipe and get two cookie pans full.

Mar 14, 2014

Diy muslin swaddled prints with a Snorlax

I swear, this is going to be the last one.  I think we've painted and exacto-knifed ourselves out for a while.  I bought a remnant of the muslin that was just too big for a little baby.  So we chopped it in half.  

One for buffalo (post) and one for ..............

Wait for it...........

the Snorlax!!  


For those of you who don't know, a Snorlax is a Pokemon.  Who, is adorable, and if anyone wants to make me one of these, I'd let you, for free even.   (The husband claims that anyone who is younger the 35 probably knows what a Snorlax is.  Interesting stat I think)

The last few months, the husband has been making me watch these classic Anime videos...which some were good, but some were not.  But, how could I forget, that I myself, is/was a slight anime nerd.  I'd forgotten that in high school I would watch Pokemon.  I don't know why, I just liked it, a lot.  The husband has recently informed me that it actually was a game.  I had no idea.  I just liked to watch the cartoons, which, in case you were wondering, have recently been added to Netflix!

Anyways, Hannah and I were brainstorming and we came across said Snorlax.  He could be adorable on a boys blanket right, yes, yes he could and is.  He was a little harder to find an image for.  I actually found a video clip that had him in just the right position and did a Print Screen Shot on the computer.  Then we printed him out and started cutting him out.  Once again, I started the cutting, but Hannah finished it out. 


After testing him out on some cardboard we were ready! We centered him on the blanket and started painting. 


 After getting him applied, we started on the "Zzzzz."  I don't know why, but the Snorlax is always sleeping.  ALWAYS. 


I think he turned out pretty dang cute.  Plus, I've never seen another one like it, which is always a bonus in my mind.


Thanks to Hannah for helping all my muslin swaddling cloth dreams come true!  I probably never would have done it (or watched her do it) if she weren't around!

I posted these before, but here are some tips and instructions on stenciling. 


Some tips that I learned from Hannah on Stenciling. 

1.  Make sure your exacto-knife is sharp and your eyes are even sharper.  You may want to print a few of your patterns so if you mess up one by cutting something wrong.  Hannah even colors one ahead of time just to make sure she knows what she does and doesn't want to cut out. 
2.  When printing on the stencil paper there will only be faint lines.  Make sure to print on some scrap after running the stencil paper through to get all the left over ink that didn't print. Otherwise, you'll go to print something and it will be covered with random lines of buffalo. 


3.  Always cut your stencil out on some surface you don't mind cutting up. 
4.  Always test your stencil on something else before diving into your material.
5.  We like to tape our stencils to the cloth.
6.  Always dab off excess paint before applying to cloth. 
7.  Hold the stencil with one hand to keep it steady.  You'll want to dab your paint brush STRAIGHT up and down to avoid bleeding underneath.
8.  Once you'd applied your paint, pull stencil immediately after. 
9.  You'll want to make sure you didn't get any excess paint on the back of the stencil before laying it down again on your surface.  
10. If you are going to use a stencil multiple times, make sure to stop and let it dry after 10 times or so, depending on the details.  It may be more or less times you can use it, but you'll start to notice it sagging and just not coming out quite as sharp.  I've actually found that after the paint dries it's basically been plasticized and works really well after. 
11. Stand back and be amazed.  You did it. Yes, you are awesome and so is that stencil.  


Here are the basic utensils we used for stenciling. 

Hannah prefers the shorter style paint.  She also really likes her fat stubby paintbrush. (green one.) We used the standard sponge brush on the bison and the short sponge brush.  We use the fine paint brushes on really small detailed work, like on the tiny little "z."  Also, this is her beloved paint tray. 

Mar 13, 2014

Bye son, Bison, DIY Stenciled Onesies and DIY Baby BisonSwaddlerBlankets.


Let us start out with a joke by the husband.  
Husband: "Why did you decide to use the Bison?"  
Me: "I don't know, it spoke to me."
Husband: "Is it because you wanted to be able to say "Bye son"."
Me: I usually don't respond to his jokes anymore.

To continue on with little brother's blankets, I decided to try something a little beyond my skills.  It had to do with a Bison, excato-knife, potato, and scissors.  Supposedly, you make stamps with potatoes.  I saw them here.  Which, I'm sure you can, just not with the particular design I chose.  My start to finish lasted about 4 minutes and in disaster.  It didn't even go far enough to even show you.  I gave up after my paper started shriveling up from the potato. 


Then, my sister Hannah took over.  As much as she claims that she is not a crafty person, she really is.  It's just the perfectionist in her that stops her  She made Aiko a few onesies, that she stenciled and painted herself.  They turned out awesome here.  Hannah and her OCD self probably couldn't bear to watch me muff it up again. 

We pulled out our stencil paper, resized and printed our buffalo (by we I mean she.) and started cutting.  Make sure to have some kind of surface under the stencil paper so you don't cut up your table. 


She's pretty good right?  We did have to delete some of the buffalo, there were just too many little lines.  After we tested out the stencil, she applied it to the onesie!

Print purchased from Etsy Shop PrintitFrameit


I know, I know, it's pretty rad.  If only I could have a crafting-slave-perfectionist who I just bossed around and said "good job" to after they finish.  But don't worry, eventually I did join the bison-exacto-cutting-fun.  See, I had some other big plans for this bison.  We did one successfully, WHY NOT MILLIONS?!


Well, how about five. We printed up four more bison and I myself, even cut out two of them.  It's kind of a long process, but once you have the stencil you can use it quite a few times. 


By quite a few times, I mean a lot.  (I'll put some tips at the end of this post.) We decided to apply it to another Swaddler Blanket.


Boy, am I glad we did.  I was a little worried that all the detail would get lost on the texture of the muslin, but it worked out great!  We did mainly yellow buffalo with a few random blue ones.   


After finishing with the buffalo we realized we needed a little something more.  So I took a chapstick and placed dots.


I was too lazy to pull out my good camera, plus I don't really know how to use it beyond Auto anyway...so you have some different colored photos going on here.


What do you think?  Pretty cool right?  And really, it's not that hard, I promise.  It take some time, but once you have your stencil you can use it over and over again.  

Some tips that I learned from Hannah on Stenciling. 

1.  Make sure your exacto-knife is sharp and your eyes are even sharper.  You may want to print a few of your patterns so if you mess up one by cutting something wrong.  Hannah even colors one ahead of time just to make sure she knows what she does and doesn't want to cut out. 
2.  When printing on the stencil paper there will only be faint lines.  Make sure to print on some scrap after running the stencil paper through to get all the left over ink that didn't print. Otherwise, you'll go to print something and it will be covered with random lines of buffalo. 

3.  Always cut your stencil out on some surface you don't mind cutting up. 
4.  Always test your stencil on something else before diving into your material.
5.  We like to tape our stencils to the cloth.
6.  Always dab off excess paint before appliying to cloth. 
7.  Hold the stencil with one hand to keep it steady.  You'll want to dab your paint brush STRAIGHT up and down to avoid bleeding underneath.
8.  Once you'd applied your paint, pull stencil immediately after. 
9.  You'll want to make sure you didn't get any excess paint on the back of the stencil before laying it down again on your surface.  
10. Stand back and be amazed.  You did it. Yes, you are awesome and so is that stencil.  


Here are the basic utensils we used for stenciling. 

Hannah prefers the shorter style paint.  She also really likes her fat stubby paintbrush. (green one.) We used the standard sponge brush on the bison and the short sponge brush.  We use the fine paint brushes on really small detailed work, like on the tiny little "z."  Also, this is her beloved paint tray.


Bison Print purchased from Etsy Shop PrintitFrameit.

Mar 12, 2014

DIY Swaddler Lego Blanket


These last few weeks I've been either insanely productive, or insanely lazy and tired.  It's been crazy weather, which, I attribute to my pregnant self.  This last week, my sister Hannah and I got crafty.  I'm super picky about everything apparently, which is even worse when it comes to my kids style.  I feel that everything should be unique which usually means should be handmade.  Hence, we decided to make our own swaddling cloths for the little man.  Which, it takes me forever to try and research something that is quirky enough for me.  Luckily, I'm super good at copying people's Pinterest ideas, but I apply them other ways. 


At Joann's, you can buy muslin for $5.99 per yard.  Combine that with your 40% coupon and you have an awesome blanket.  We had to break into our brand new lego box that I got on Black Friday.  Take some Fabric Paint, dip your legos and stamp.  It was that easy and that awesome looking.  You do have to sew the raw edges...but that's what you have moms for right?  (Because, this mama, DOESN'T/CAN'T SEW)


 I have what you would call a "Lego Nazi Husband."  (click to read previous posts) He has some serious rules about the usage of legos and I'm afraid I had to ruin some for little brother.  I really was concerned...but there was nothing I could do about it in the end. The fabric paint sticks too well and little Legos have little places that paint crawls in to.


But really, isn't it awesome looking?  Be careful when stamping to have something under it, as the paint soaks through the cloth. 

' 

Here's one last shot with the 36 week belly. 
Idea stemmed from this

A few notes about stamping with Legos. 
1.  Who will probably not want to clean the legos afters.  The fabric paint does not come off easily. 
2. Make sure to place something under the cloth while stamping so it does not soak through.
3. I took two pieces of cardboard and squirted the paint on one side.  Then, I rubbed them together so it was flatten the paint and therefore make it easier to get an even stamp.
4. I really don't sew well, even on easy projects, but take the edges of the blanket and roll once under and then sew.  See, it sounds easy, but I never find it is.  Hence, why I have my mom do it.  
5.  I was able to use each stamp about 3 times before it was too light to see on the fabric.  
6.  You'll have to clean on the lego (as best you can) when you start getting fuzzy lines.  You'll know when this happens.  I found it was easiest to scrape off with a tough piece of cardboard.  
 

Feb 18, 2014

Ewok Style Almost


Crocheted this adorable thing the other day.  Cowl?  What do people call them? 

Well anyways, it started out because I've been seeing this way too many time on Pinterest.


Then I saw this the other day.  I decided we just needed to do it.  


I loved the Ewok movie.  Not the one in Star Wars, but the other one.  I started looking at this free pattern and realized that it was an adult size and I'd have to figure out how to make it fit Aiko.  Looking at the pattern I realized how easy they were to make and that I wouldn't make it an Ewok style after all.  (Mainly, because the husband thought it was kind of weird.)  So instead, I thought we'd make up our own cowl pattern.  No, I didn't right the pattern down as I went...but I'm sure there is a free one somewhere!  The only thing I did use from the free pattern was the ears. 


Since, I mainly crochet with that baby is sleeping, I kind of guess on all the sizes.  She has a much bigger head than I thought.  Plus, I didn't really think about the button holes until it was too late.  Because, really, I'm not going to undo all that...so while it still needs some tweaking, I thought it looked pretty cute on #ohniceandchubbybaby.

Feb 14, 2014

Hearts and Belly


Hope you all have a good heart day! I got a wild hair and decided that Aiko needed a Valentine's Day shirt, complete with heart elbow patches and a headband.  I thrifted the shirt with the intention of doing some embellishment and Valentine's Day seemed worthy.

I hope you all get the reference on her shirt. 

Jan 13, 2014

Food for the missionaries


We fed the missionaries the other day, which, I feel makes me feel somewhat adultish.  I asked the husband what he wanted and he said "chicken."  To be honest, I rarely buy meat.  I only cook it when I know we are going to be feeding others.

Now that I've been in the second trimester for a while...I feel like cooking!  Hooray!  Trying out new recipes from my Pinterest board here.  (I didn't add the feta cheese but kept it separate.  I also added olives and sweet peppers...and quinoa and then decided some chicken in it was good too.   I tried super hard to follow the recipe but it's just so hard!)  

I was going to make this Blackened Chicken with Avocado...but then realized I didn't want heartburn and Auntie Mitsie doesn't handle the spicy well either...so we just made some cilantro chicken.  


Also, second trimester means I really have been craving fruit and veggies like crazy.  Started buying Bountiful Baskets again.  Over the holidays we went over budget like crazy on eating out and then groceries!  So we come back to your humbly Bountiful Baskets.  Usually we buy it throughout the year except for when our garden is going.  $15 bucks a week is a steal if you ask me. 
  

This was our haul last time (above).


This was our juicing add on.  I think it's only 8 bucks, but for all three of us with green smoothies, we need it.  I'm also going to be writing a green smoothie blog sometime.  We've been doing green smoothies pretty consistently for the last 3 years or so now.  As a Footzoner I recommend Green Smoothies to almost every client...

Jan 11, 2014

Quiet book (Updated)


I felt this was the year of the Quiet Books.  Thanks Jess for posting yours and making me realize that it just needed to be done.   Aiko's not so fond of church, so I thought I might as well join the crowds.  I really, really liked making them.  Since, I was making one I thought it was better to make two.  Aiko's cousin needed one too and conveniently, we had their family for Christmas.  (Not the cousin you see above)

 Quiet Book

I plan on adding more pages so I didn't do anything permanent for the binding. I really do love hand stitching things.  I made up Aiko's cover...sometimes I wish I had this super cute handwriting that I could call on at any moment.

  Most of my ideas came from my Pinterest board.  


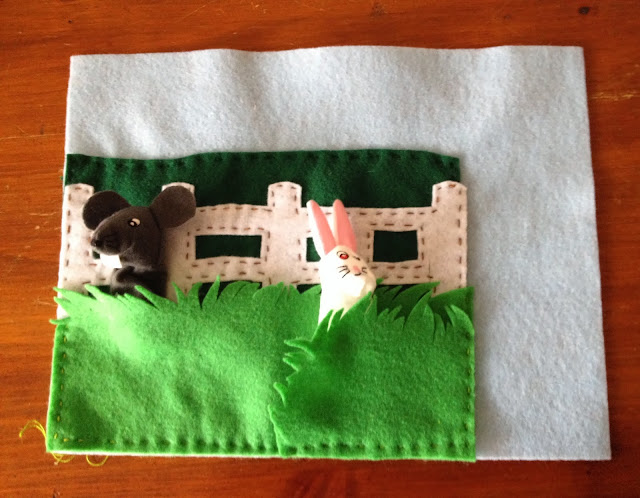
I realized that most of my pages weren't really interactive, I more just like making scenes out of the material.  Luckily, we were at Ikea and bought their super cheap finger puppets that more or less worked. Most of the patterns you see came from this Etsy shop.  She has the most lovely ideas!


I thought about making the finger puppets...but that was getting extreme. 


For some reason, these shapes are my least favorite.


One page didn't come any pinterest/etsy board though...I was quite pleased with my brain for the baseball field.  Aiko's cousin is a Big Yankees fan, so of course we had to make something baseball like.   The numbers are velcro and then they can be stashed behind the green.


Here's Aiko playing with Nixon's quiet book.  She seemed to really like it then, but doesn't seem to care much about it when at church.  Hopefully sometime she'll want to play with it again. 


In actuality, this wasn't as expensive as I thought it would be.  
Felt $14.00 (It was luckily on sale.) Enough for two books, 10 pages each. 
Ikea Puppets - One pack was 5 and the other was on clearance for 3 (because they were super weird.) Luckily, Nixon already had all the finger puppets. 
Eyelets - $7.99 Each.  I think we ended up using two packs for two books. 
Embroidery floss (Free, from my gram's) She wasn't always the most organized...see photo here
The Book Binding is just some Quilt Binding I had left over.
The Velcro is expensive I can't even remember, but I used a coupon and I'm still upset that it's expensive. 
Glue Sticks I already had. 

So really, for two books, I didn't do that bad! 


ShareThis